How To Configure The Volume Pricing?
Setting up volume pricing in Smind B2B involves 2 main steps: creating volume pricing rules then assigning them to customer groups. This guide focuses specifically on the first step: creating volume pricing rules.
Step 1: Create Volume Pricing Rule
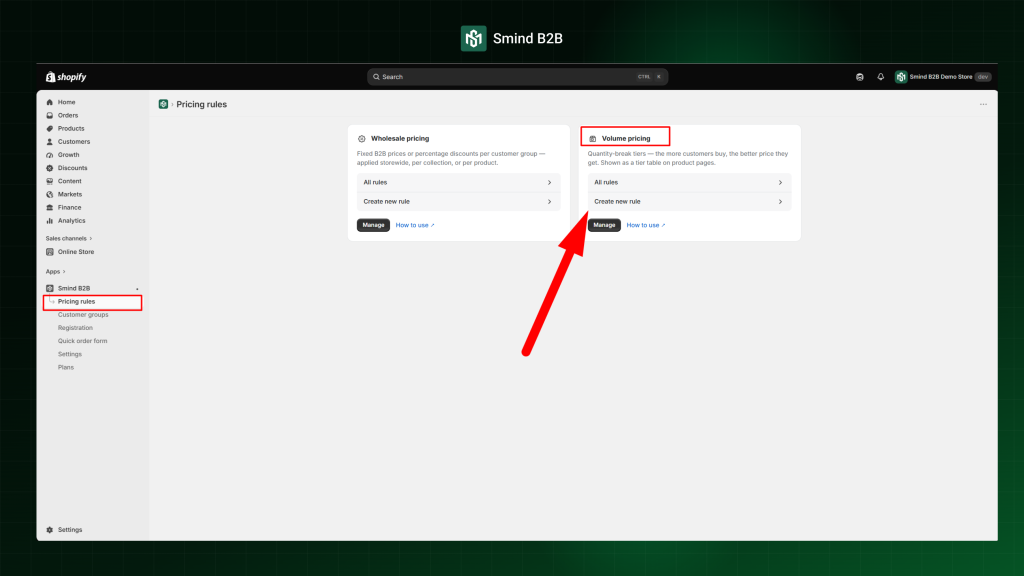
- Go to Apps > Smind B2B.
- Click Pricing Rules in the sidebar.
- Under Volume Pricing, click Create new rule then follow those steps
Step 2: Configure Volume Pricing Rule
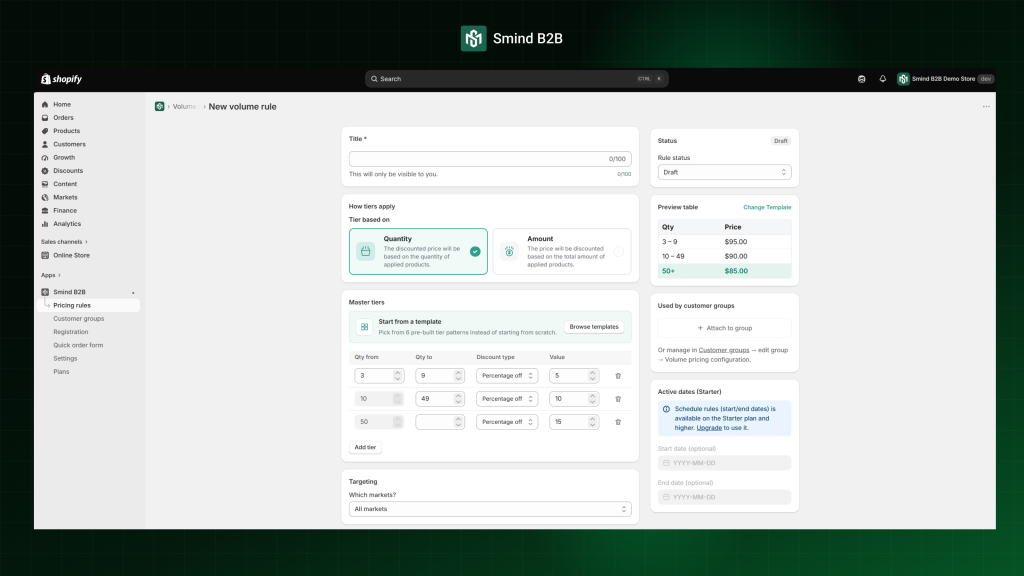
2.1. Title
Enter a title for your reference, such as “Bulk Pricing – Electronics”. This title is only visible to store administrators and will not be displayed to customers.
2.2. How tiers apply
Under Tier based on, select what triggers the tier discount. This setting applies to the entire pricing rule, so all tiers within the rule will use the same basis. Tier basis can’t be changed after the rule is created.
- Quantity (Most Common): The discounted price will be based on the quantity of applied products.
Example: Buy 10+ units, get 10% off each
- Amount: The price will be discounted based on the total amount of applied products.
Example: Spend $500+ on the cart, get 15% off
2.3. Master tiers
The Master Tier Table defines the default tiered pricing structure for all products included in this pricing rule. Click Add Tier to create/expand pricing tier. For every tier, configure the following
- Qty From: The minimum quantity required to activate the tier.
- Qty To: The maximum quantity for the tier (optional).
- Discount Type: Choose how the discount is calculated.
- Percentage off: Reduces unit price by a percentage
- Amount off: Subtracts a fixed amount from the unit price
- Flat price: Sets a fixed price per unit, ignoring original price
- Value: Enter the discount value.
Example setup for quantity-based:
| Qty from | Qty to | Discount type | Value | Explain |
| 3 | 9 | Percentage off | 5 | Buy 3–9 items → 5% off |
| 10 | 20 | Percentage off | 10 | Buy 10–19 items → 10% off |
| 21 | Percentage off | 15 | Buy 20+ items → 15% off |
2.4. Targeting
The maximum quantity of each tier is automatically determined by the minimum quantity of the next tier. To ensure the correct pricing is applied, make sure your tier ranges do not overlap. If you need to remove a tier, simply click the trash icon next to it.
In “Which Market?”, choose whether this pricing rule applies to All Markets or only Specific Markets.
This setting allows you to limit the discount to selected regions or apply it globally. For this example, we’ll select All Markets, which means the wholesale pricing rule will apply in every market for customers who meet the selected customer group criteria.
2.5. Product
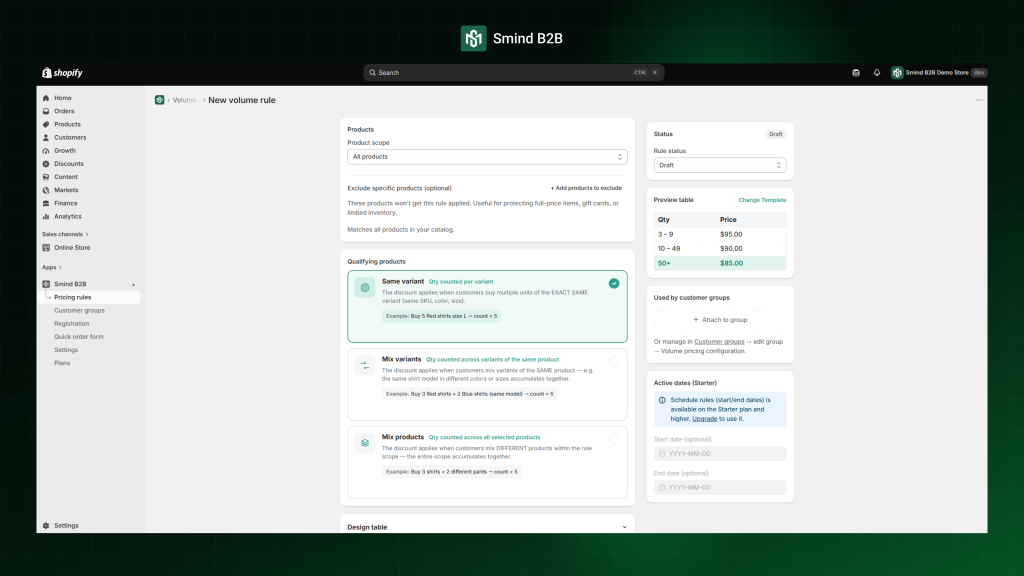
Under Product scope, select the scope that determines which product apply this pricing rule.
- All products: Applies the rule to your entire product catalog.
- Specific products: Applies the rule only to selected products..
- Collections: Applies the rule to all products within one or more collections.
- Product tags: Applies the rule to products that carry specific product tags.
- Vendor: Applies the rule to products from a specific vendor.
This setting determines which products receive the wholesale discount.
For this example, if select All Products, so the discount applies across your entire store catalog. If needed, you can also exclude specific products from the discount. This is useful for protecting full-price items, gift cards, or products with limited inventory. To exclude products:
- Choose Product scope = All Products
- In Exclude specific products (optional), click Add Product to Exclude
- Select the products you want to exclude then click Add to save your selection.
2.6. Qualifying products
This setting controls how the app calculates the purchase quantity to determine which pricing tier applies.
- Same variant: Only the exact product variant (SKU) is counted. For example, if a customer buys 30 units of Size S and 30 units of Size M, each variant is counted separately, so neither qualifies for the 60-unit tier.
- Mix variants: All variants of the same product are combined. Using the same example, 30 units of Size S + 30 units of Size M are counted together as 60 units, allowing the customer to qualify for the higher tier.
- Mix products: All eligible products included in this pricing rule are combined. For example, purchasing 25 units of Product A and 25 units of Product B counts as 50 units in total when determining the applicable tier.
2.7. Active dates
You can schedule when this wholesale pricing rule becomes active and when it expires by setting the Start Date and End Date.
Leave both fields blank if you want the rule to remain active indefinitely. This feature is useful for running time-limited wholesale promotions or seasonal pricing campaigns.
2.8. Design Table & Preview Table
You can customize the volume table style via Design table. A CustomCSS (advanced) editor is available for further customization. Use the preview table to see how the tier table looks on the storefront before saving.
Preview table: Choose how the volume pricing table appears on your storefront. 7 built-in templates are available
Step 3: Active Rule & Save Rule
- Under Status, change the Rule status dropdown from Draft to Active
- Click the Save button in the top right corner
- You should see a confirmation message “Volume rule created”
You have now successfully created a volume pricing rule. The next step is to assign the rule to the appropriate customer group(s) so it can be applied to the right customers.